The Office Events Section inside the Client’s File Information tracks and organizes your workflow for completing a specific task (or tasks) for the designated Account Year, for the designated Business Type. ATOM continually tracks and stores multiple data points for each status for your records.
NOTE: Specific Business Type workflows will work better in a linear (only one event open at any given time) while others work better in a multi-linear (multiple status events open at once) workflow. We strongly suggest that Tax Preparation stays in a linear workflow as a best practice. If you feel you need a multi-linear flow for Tax Preparation please consult with the ATOM Staff on the best way to utilize ATOM and key features when training your staff.
Videos #
Office Events – Permanent Event Note
Office Events – Assigning Events
Office Events – Client Notifications
Office Events – Predefined Notes
Office Events – Sort by Ordinal rather than by Start Date
Field Descriptions #
Navigating Buttons & Office Event Links #
Checkboxes, drop-down menus, and buttons at the top of the section.
All Events – Checking this box will cause all events that the client has had to display. By default, only the open Event(s) will display when viewing the Events section inside the client file. This setting, when enabled, display all open and closed Events.
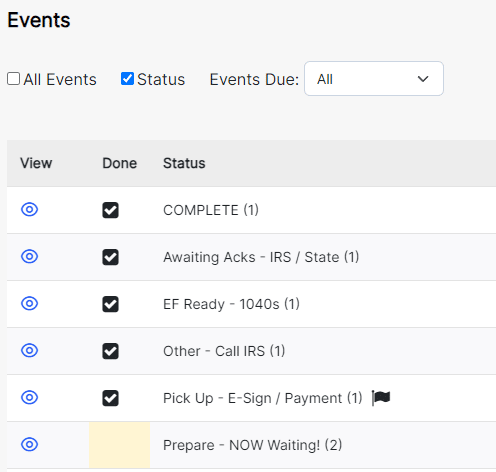
Status – This checkbox will organize the events based on the Event Status. Clicking on the “eye” for an event group will display each of those events. This setting is more useful for clients that have had many events and/or has had the same event created several times.
Events Due – This drop-down menu allows the events to display based on Event Due Date. There are options for Today, Next 7 Days, Next 30 Days., and All. All is set as the default and will display all Open events. Next 7 Days will only show events that are due within the next 7 days. Next 30 Days will only show events that are within the next 30 days. These settings are more applicable to non-linear Business Types.
Add #
Action button to launch the Add Event Form Window.
NOTE: This feature allows the addition of events to your workflow with the extra functionality of adding notes, assignments, dates, priority, and overrides at the same time. You can add one event and “Save/Close” or continue to add more than one event with the “Add Additional Events”, without closing the form. *All fields in the form will be explained in the outline below.
SET UP 1: The ability to add more than one open event at time to the workflow (in allowed scenarios and Business Types) is set in ADMIN>Users>User File>Security Restrictions and Permissions – Allow Account Event Modifications selection.
SET UP 2: If your office prefers to use the Add New Event option in a Linear Workflow (only one event open at any given time – e.g. Tax Preparation) you will want to set each Office Event (i.e. Event Status) in ADMIN>Category Types>Event Status / Office Events>(filtered by Business Type)>find your Event Status> check the box for “Close Last Event”.
Actions #
This button contains various actions that pertain to the client file.
Bill Events – This action allows you to create a transaction based off the billable amount in an event. It will pull the Amount from the event but you can override this if you want. You will also need to select a transaction type. You can also add a Note and there are options for creating either a Lump Sum Transaction or an Individual Transaction. Clicking either of these will add the transaction to the client’s Transaction section. Once the transaction is created, the Billable column will have a date inserted into the Billed field.
Delete – This button will delete the select Event(s).
Export – This will export the Event(s) and its columns over into Excel.
Move Events – Allows the User to move the Event(s) to a different Account Year or a Linked Client’s Account Year.
Override Fields – Feature that allows the User to override the information in various fields for the Event.
Print #
This button contains a few printing options available to this section.
Billable Report – Creates a Billable Report based off the Date Range selected and the information from the Event(s).
Account Event History – Creates a report showing the client’s Account Event History. The report displays the Event name, Notes, and Billable information.
Account Event Notes – Creates a report that displays a list of Events the client account was in and the Event Notes. Also displays the Start and End Times of the Event as well as the Due Date.
Update #
Action button to mark an event as Done / Undone, when selected from the Done Column, by adding or removing, an immediate End Date time stamp for the selected event(s).
SET UP: This option is only available for Users with permissions to edit events in Users>User File>Security Restrictions & Permissions – “Allow Account Event Modifications” Selected
NOTE: This function is more appropriate for Users who work with non-linear workflows where files have more than one open event active at a time.
Ordered Appearance & How to Sort Events #
Default Sort View for new Business Type Events
Office events will sort in chronological Start Date Order, with the Open Events (no End Date) defaulted as [Show Only Open Events] unless otherwise changed. *This view is more appropriate for linear workflows (only one status open at a time) like Tax Preparation.
Sort by Ordinal rather than by Start Date #
Many Business Types’ Office Events are better viewed by the Ordinal (as they are listed on the Home Screen) inside the client file. This view can be set in ADMIN>Category Types>Business Type>Order Client Account Events by Ordinal Selection. *The template business types of Bookkeeping and Payroll will have come preset to order by ordinal.
Temporary Selected Sort by Column Header #
Sort the Events in either ascending or descending order by clicking on the Column Heading.
Office Event Columns #
Office events can display as Open events only or All events open and closed based on how Users navigated to the page, by default based on the ADMIN>Category Types>Business Type setup, or by organized or filtered view settings at the top of the section. They can also be sorted by Columns when sections have been selected (by mouse click) on the Header Columns. The column options and data house within are discussed below.
Actions – In Standard (Saved) View #
Actions contains several actions that are used to interact with the Event.
Selectable check box – is at the header and next to each event allows you to select the event and utilize features from the Actions button.
Edit – The Edit button will open the event for editing.
Delete – The Delete button will allow the User to delete the Event.
Note: Users will need to have “Allow Account Event Modifications” enabled in their User file in order to be able to Delete Events.
Checklist – Checklists are setup in Admin > Category Types > Event Status / Office Events and are used to add checklist items that belong to the event.
Actions – In Edit (Open) View #
Save – Clicking this will save the changes made to the Event.
Cancel – Clicking this will cancel the changes and keep the Event as how it was.
Done #
A check box that allows you to mark an event as done. Works with the Update button. See above regarding “Update”.
Yellow Highlight – Highlight column to visually denote when a status is open or complete (has an End Date) Yellow: denotes a status is open and does not contain an end date No highlight: denotes a status is closed and contains an end date.
Status #
Display Field of the Customized Office Event Status (e.g. Pending, Tax Preparation, Weekly Payroll, January, etc.)
Notes – In Standard (Saved) View #
Display of saved Office Event Notes: notes that have been added, upon creation or when edited, and saved Permanent Event Notes
Expand / Collapse Arrow – Link to Expand (or collapse) the individual Event Notes.
SET UP: Users may activate the selection to automatically display a condensed (collapsed) view of event notes within client files and on the Office Event Group view in ADMIN>Users>User File>General Settings>“Allow long notes to display condensed” selection
NOTE: The arrow to Expand /Collapse Notes will only appear if the above selection is active for the User
Permanent Event Note Icon – Link to launch the form to add, or edit, Permanent Event Notes.
NOTE: Permanent Event Notes are Event AND Client specific. Permanent Event Notes will display in the “Notes” section with the label of “Permanent Note: xxxxxx“ and will display every time this event is opened for this client. Any edit will edit all notes in open, and closed, events that the note is attached to.
Notes – In Edit (Open) View #
NOTE – Open data field for entering notes for the Office Event.
Expand Note Window Web Function – Select and drag the note window larger or smaller with your mouse for your viewing preference. *This option is a function of your Web Browser and not inherently a part of the ATOM programming and therefore not available on every browser type.
Time Stamp Icon – Link to add the User’s name and timestamp inside the Notes section prior to their notation.
Predefined Note – A drop-down menu where you can select a predefined note to add to the Notes field
Add Predefined Note – A shortcut to Admin > Category Types > Event Status / Office Events where you can create Predefined Notes to add to the Event Status for future use.
Assigned To – In Standard (Saved) View #
Assigned To – Display of selected Users who have been Assigned to the Office Event.
Keep Assigned – Red check mark to designate that the User assigned to this Office Event will continue to be “assigned” even if an End Date has been added to the event dates, closing the event.
Assigned To – In Edit (Open) View #
Assigned To – Open selection menu to add the office event assignment to one or multiple users; the assigned task will then display in the User(s) “My Assigned Tasks” based on the assignment date.
NOTE 1: Use standard keyboard hotkeys to select more than one user at a time (SHIFT+point=sequential selections, CTRL+point=non-sequential selections, SHIFT+A=select all *as long as your mouse was at the top of the selection).
NOTE 2: The assigned Office Event will not display in the User’s assigned tasks if the Office Event is Closed without selecting the *Keep Assigned: option when saving the assignment
Keep Assigned – Selection Box to keep the assignment active, in the selected User’s assigned tasks, for as long as their name is selected in the Assigned To section after the event has an end date.
NOTE: This function was originally designed as a training tool to allow a User to still see the assignment notes even after the account file may have moved through further office events. This is more appropriate to use when notation of the completion of the event (e.g. reviewer found a small mistake and was able to correct the file and send it on to E-file without the need to hold up the file so the preparer can see the note) is more important than the assignment itself. Care should be taken to NOT select this option if the status is open and will be completed (end date and new status created) once the assigned User has finished the assignment.
Assigned/Due Date – In Standard (Saved) View #
Assigned Date – Date which the assignment (when a name is selected in the Assigned To section) will show in the User’s Assigned Tasks shown on the Home Page User Overview in the “Assigned Tasks” page *today’s date will default when no specific date is selected.
Due Date – The date in which an assignment or the Office Event is due. This field will highlight in Yellow when Due or Past Due. This information will also populate in the Organize By Status view.
NOTE: the due date can serve two functions in ATOM depending on how you choose to utilize the work flow and assignments:
Assignment Due Date: The date in which the Assigned User should complete the assignment.
Office Event (Event Status) Due Date: The date in which the open Office Event (Event Status) should be completed by. *This function is typically utilized in a non-linear flow (BK, Payroll.) This date will also control the Home Page Office Event “Due Today” or “Past Due” notices when the Display Past Due: Days After Event Due Date option has been selected. This is done in ADMIN>Category Type>Event Status>System/Customized Event Status>Display Past Due – Days After Event Due Date Selection On.
Days After Due Date – Number of days after the saved due date plus the notation of “Due Tomorrow, Due Today, or Past Due: #.
Priority – Notation of saved Assignment Priority.
Assigned/Due Date – In Edit (Open) View #
Assigned Date – Open Date Field to enter a specific Assignment Date.
Assigned Date Calendar Icon – Icon to launch the calendar window to select a date from a viewable calendar or by selecting “today’s date” located below the calendar grid.
Copy to Due Date Arrow Icon – Icon link to copy the Assigned Date to the Due Date.
Due Date – Open Date Filed to enter a specific Due Date.
Priority – Pulldown menu to select an assignment Priority from the following options: Low, Medium, High, or Urgent *Prioritized assignments will filter to the top (by priority) of the My Assigned Tasks list for the assigned User.
Client Notification – In Standard (Saved) View #
Disable Notifications – Visual checkmark icon to denote if the Automatic Predefined Office Event (Event Status) Messages have been disabled.
Days – Interval of Day(s), if applicable, that the Automatic Predefined Event Status Message is scheduled to be sent with notations of (Default) when on the default interval schedule or (Override) when the interval has been manually overridden in the edit view.
SET UP – Predefined Event Status Messages are set in ADMIN>Category Type>Event Status>System/Customized Event Status>Predefined Notifications>EVENT NOTIFICATION X DAYS FROM START DATE
Days to the next Notification – The number of Days until the next scheduled Automatic Predefined Event Status Message is scheduled to be sent. “No notification” will display when there are not scheduled messages.
Message History – Icon Link to open the Account Event Notification Log of the Event Message history listing the Address or Text Number the message was sent to, the Client Name of the recipient, the Subject, Message language, and the timestamp of the Date the message was sent.
Message History (Count) – Total number of messages sent to the client.
Send Predefined Notification Link – Link to launch the Send Client Notification window to compose, or select a Predefined Message, to send as email, text, or both.
SET UP – Predefined Event Status Messages are set in ADMIN>Category Type>Event Status>System/Customized Event Status>Predefined Notifications>PREDEFINED CLIENT NOTIFICATIONS.
NOTE 1: The link will turn Orange when there are saved Predefined Notifications for the Event and the language will prefill when opening launching the window. The link appears as a blue hyperlink when no language has been saved * you do not need saved Predefined Event Status Messages (orange link) to use the link to launch the Send Client Notification window to compose a new message.
NOTE 2: All predefined language can be edited before sending.
NOTE 3: If you wish to send ONLY a Twilio Text message you MUST include a Message Subject of at least “x” to enable the text.
Client Notification – In Edit (Open) View #
Disable Notifications – Open Check Box field to disable any Automatic Predefined Office Event (Event Status) Message.
Override Days – Open data entry field to override the interval of days between scheduled Automatic Predefined Event Status Messages *this section will grey out when not applicable.
SET UP – Predefined Event Status Messages are set in ADMIN>Category Type>Event Status>System/Customized Event Status>Predefined Notifications>EVENT NOTIFICATION X DAYS FROM START DATE
Billable – In Standard (Saved) View #
Contains billable information pertaining to the event.
Billable – Visual checkmark icon (or lack thereof) to denote if the Office Event (Event Status) has been marked for billable time tracking.
Billed – Billed works with the Bill Events Action and is a checkbox that indicates if the Event has been “billed” yet. Once checked, a date will appear next to Billed.
Rate – Rate displays the billing rate for the Event. You can manually add or edit the rate. If an Event is setup to be a Billable Event in Admin > Category Types > Event Status / Office Events, the rate will automatically be added.
Budgeted Hours – Budgeted Hours will display the hours that are budgeted towards the Event.
Billable Hours – Billable Hours displays the amount of billable hours accrued. This field also has a stopwatch that can start/stop the clock tracking the billable hours.
Amount – The Amount field computes the amount based off of the hours and the rate. Variance tracks the difference between the billable hours and the budgeted hours.
Variance – Calculated difference between Billable Hours and Budged Hours, when available. Difference highlights in Red when there is negative variance (over budget) or Green when there is a positive variance (under budget).
Billable – In Edit (Open) View #
Billable – Open Check Box field to select, or unselect, the Event for Billable Event tracking.
NOTE: Billable time selection will default based on the set up of the Office Event (Event Status) in ADMIN>Category Types> Event Status/ Office Events>System/Customized Event Status>Billing Rate entered but can be manually overridden in Edit view.
Billed – A checkable box to indicate that the Event Status has been billed.
Rate – Open Field for Billable Event Rate amount.
NOTE: The Billable Rate will default based on the set up of the Office Event (Event Status) in ADMIN>Category Type>Event Status / Office Events>System/Customized Event Status>Billing Rate entered but can be manually overridden in Edit view.
Budgeted Hours – Open Filed for Event Hourly Budgeted time.
NOTE: The Budgeted Amount Rate will default based on the set up of the Office Event (Event Status) in ADMIN>Category Type>Event Status / Office Events>System/Customized Event Status>Budgeted Hours entered but can be manually overridden in Edit view.
Billable Hours – Open Field for total billable hours *defaults to the total calculated time using the difference between the Start Date/Time and then End Date/Time but can be manually overridden in the edit view.
Date/Times – In Standard (Saved) View #
Start Date – The Date the Office Event (Event Status) will begin within your workflow and defaults to your creation date unless another start date is selected for override
NOTE: “Begin within your workflow” defines and sets a number of functions in ATOM:
1. The Start Date determines when a client will appear within your Home Screen Office Events Workflow *events with a future start date will exist in the client file but will not appear in the workflow till you need to see it (in the workflow).
2. The Start Date determines the next start date of any recurring event based on the Event Status setup for recurrence. e.g. Weekly Payroll (with a 7 day recurrence set up) with a start date on Monday, January 1st and is completed as a recurring event (with an end date of January 3rd) will create the next recurring event on January 8th.
3. The Start Date determines the assigned dates within Office Event (Event Status) Assigned Check Lists with Due Dates (Days from Start Date).
4. The Start Date determines when Predefined Event Status Messages set for “Event Notification X Days From Start Date (or last emailed date) will be sent to the client.
End Date – Date that the Office Event (Event Status) was closed.
Creation Date – The hardcoded date the Office Event (Event Status) was created and cannot be altered.
Hours – The total number of hours accrued between the Office Event (Event Status) Start Date and End Date.
Days – The number of days between the Office Event (Event Status) Start Date and the End Date.
Dates/Times – In Edit (Open) View #
State Date – Open Date Field to enter a different Start Date, if needed, rather than the defaulted date.
NOTE: User permission to edit Start Dates is set in ADMIN>Users>User File>Security Restrictions & Permissions>Allow Account Event Modifications.
Start Date Calendar Icon – Icon to launch the calendar window to select a date from a viewable calendar.
Start Date Time Stamp Icon – Icon link to create a Start Date with current date and time.
End Date – Open Date Field to enter an End Date, if needed, rather than the defaulted date.
NOTE: User permission to edit End Dates is set in ADMIN>Users>User File>Security Restrictions & Permissions>Allow Account Event Modifications.
End Date Time Stamp Icon – Icon link to create an End Date with current date and time.
End Date Calendar Icon – Icon to launch the calendar window to select a date from a viewable calendar or by selecting “today’s date” located below the calendar grid.
User #
Created By – User who created the Office Event (Event Status) hardcoded into the event data and cannot be overridden.
Modified By – User last to Modify (change) the Office Event (Event Status) and save their changes.
Event User – Pulldown Menu (and Display) of the Event User associated with this Event Status (Office Event.) The Event User displays on Office Event Group screens and reports and upon creation will default to the User who added the event but can be overridden to another User using the pulldown menu or Even Overrides functions.
Settings #
Copy – Selection (and display) of the rollover settings for the Office Event (Event Status) *this feature is typically utilized in multi-linear, and recurring, business types like Payroll and not as appropriate for Tax Preparation. The following setting definitions can be defaulted in ADMIN>Category Types>Event Status / Office Events>System/Customized Event – Copy Selection Options or can be overridden in the Override Fields selections.
Copy Option – Selection to enable the copy of the open event (with all notes, dates, and assignments) into a newly created account year, while the current event remains Open in the original account year at the same time.
Copy and Close Option – Selection to enable the copy of the open event (with all notes, dates, and assignments) into a newly created account year, while closing the current event in the original account year.
Don’t Copy (empty) Option – Default option, unless defaulted in ADMIN settings or overwritten by selection, for all events that does not create copy rules for new account years. The Don’t Copy pulldown option can be selected to negate the current copy/copy close selection.