If your client had originally sent a message to your software via the Prospect Portal, that message will be stored in their Prospect Messages Log.
Note: Only non-clients can send messages via the Prospect Portal. If a client file was created from the prospect message, the prospect message will be stored in the clients Prospect Message Log. Prospect Portal messages can also be moved to existing client files.
Organize By Prospect and Filters #
At the top of the page, there are settings for Organize By Prospect and Filters.
Organize By Prospect: #
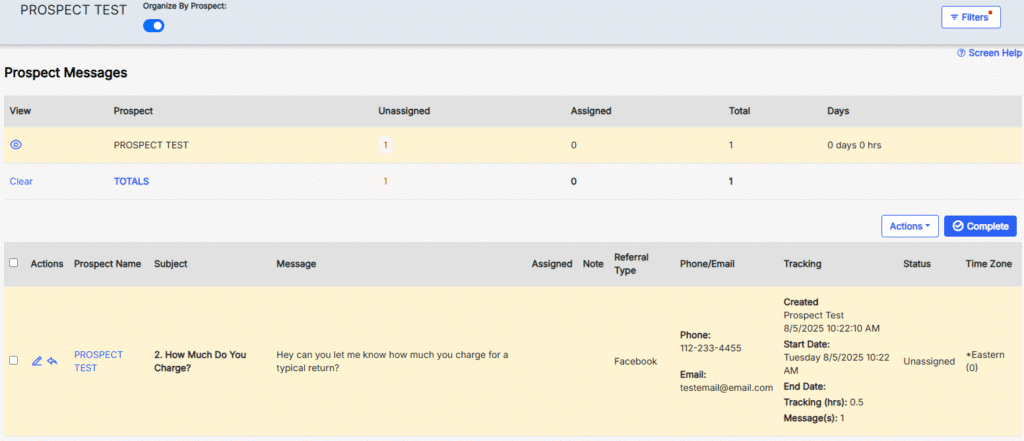
This switch organizes the prospect messages based on the prospect name. When enabled, the top of the page will have new options.
View – Displays the messages for the prospect.
Prospect – The name of the prospect.
Unassigned – Value that indicates how many unassigned messages there are in the log.
Assigned – Value that indicates how many assigned messages there are in the log.
Total – Total number of messages in the log.
Days – Number of days the messages have been open.
Clear – This clears the Prospect being viewed below.
Totals – Displays totals for Unassigned, Assigned, and Total.
Filters #
Clicking the Filters button will open a side menu that has filters for Status and Subject.
Status – Dropdown to filter based on: All Except Completed, Unassigned, Assigned, Completed.
Subject – Selection to filter based on Subject lines.
Actions and Complete #
Buttons for Actions and Complete can be found above the Message fields.
Actions #
This button contains a handful of actions that can be used on selected Prospect Messages.
Assign To – Allows the selected message(s) to be assigned to a User or Users. Priority can also be set up here.
Move Prospect – This opens a search menu where you can move the selected message(s) to another client file.
Remove From List – This action will remove the selected message(s) from the list.
Complete #
This button will complete and close out the selected message(s). A Complete button is also found at the bottom of the page.
Field Descriptions #
Selection Box – Checking this will select the message(s); allowing Actions and Complete to interact with it.
Actions – Contains icons for Edit and Reply. Edit allows you to enter a note, assign, adjust Assigned Date, Due Date, Priority, Start Date, and End Date. Reply opens a message screen where you can create a message to send to the prospect.
Prospect Name – Displays the name of the prospect.
Subject – Displays the Subject line of the Prospect message.
Message – Displays the message.
Assigned – Displays who is assigned to the message.
Note – Displays any internal notes that have been added to the message.
Referral Type – Displays the referral type that prospect selected.
Phone/Email – Displays the prospects phone number and email address.
Tracking – Displays who created the message, the day it was created, the Start Date, the End Date, how many hours it has been open, and the number of messages.
Status – Indicates whether the message is assigned or unassigned.
Time Zone – Displays the Time Zone the prospect selected when sending the message.